
Trail camera basics: It’s up to you. Unfortunately, that’s my reply to most questions at my trail camera seminars. There is no one-size-fits-all camera or method or even goal. There are plenty of choices and compromises to contemplate. But don’t be overwhelmed or disheartened. Making some choices concerning your specific needs will simplify your quest for success.
Choosing The Right Trail Camera
Despite all the fuss about the latest and greatest models, nobody knows which trail camera is best. But let’s see if we can find one that suits your specific needs. First of all, there are a few camera companies, especially those that make their products in this country, that produce reliable, high-quality units yielding better images. One school of thought is to spend the extra money to buy one of these cameras. The other is to lower the bar as well as the bill and buy several cheap units on sale, hoping one or more cams hold up for a while. Or you can shop for something in-between. Again…it’s up to you.
Another consideration is the type of camera. Poring over dozens or even thousands of photos while afield is somewhat akin to waiting until birth to find out the sex of a child. The surprise factor can be an adrenaline rush. But maybe modern technology is your thing, and you need instant gratification. For a little more money, you can purchase a wireless camera (using Wi-Fi or cellular technology) that sends pictures in real-time to your smartphone. If your camera is at a distant locale, wire-less might be the way to go.
All the Right “Whistles and Bells”
Most camera companies have produced dud models at one time or another. Unless you’re sold on the customer service or reliability of a specific company, your best bet is to choose a camera based on the features that suit your needs.
Since many trail camera shots come at night, choosing the type of flash a trail camera uses is probably the most impactful decision you’ll make. Picking your flash type also entails the most compromises.
We mentioned price, which is often a huge factor, there are exceptions, but you usually get what you pay for. On the other hand, the cheapest of cheap models can do some pretty amazing things, so a knock-off unit might be all you need. Often, you can get good deals on last year’s models.
What about megapixels? More megapixels means higher quality images, right? Today’s units often boast 12 or 15 or even more megapixels. The truth is that most trail cameras use cheap image processors that can produce no more than three-megapixel images. Some trail camera computers use a process called interpolation to digitally copy pixels, which does nothing to enhance your photos. It just takes up more space on your memory (or SD) card and slows down recovery time (the time it takes for the camera to trigger the next photo). It’s a shameful tactic designed solely to sell you a camera. The only way to know the quality of any camera’s photos is to look at those photos. That’s why the review sites showing examples of images for each model are so handy.
Speaking of recovery time, how important is that? And how crucial is trigger speed, the time it takes a camera to recognize a subject and take a photo? If you use bait to attract or keep deer in front of the camera, it probably doesn’t matter much. If you want to catch deer on the move, fast trigger and recovery speeds are paramount. If you have “the need for speed,” set your camera on “burst mode” to snap a series of photos as quickly as possible.
If you don’t want to miss a single frame of action, set your camera on “video mode.” Or you can set some cameras to “time-lapse mode” to take photos at chosen intervals so you can keep a constant eye on an area. It’s worth noting that some models with the swiftest trigger speeds and recovery times can be fast in part because the units have a pre-set focus. In other words, if the deer isn’t in the pre-set focus range of say 12-15 feet, the photos will be blurry. It’s a trade-off worth consideration. It’s up to you.
How about flash range and detection range? If you want to catch a buck cruising on the other side of the food plot, a long flash range and detection range may be vital. What’s more important to me is an adjustable flash range. I love getting close-ups, and many cameras, especially those with no glow flashes, have pre-set flash ranges that will “blow out” or overexpose a subject at close range. I’ve been known to set the flash at its lowest setting and take it even a step further by putting frosted tape over the flash to further diffuse the light for closer shots.
Whitetail Trail Camera Set-ups
Below are some tips to help you catch and keep whitetails in front of the lens as well as some input on how to make your photos more interesting. Although we often see more deer in open areas, they are usually more comfortable in cover, especially if there’s an unusual, smelly box strapped to a tree in front of them. Go the extra mile (or 50 yards) by setting up in a more remote area with a tree canopy.
We often get excited when we see wide game trails plowing through the snow or CRP fields. If you’re looking for a doe group or some young bucks, hang your camera overlooking the beaten track. You might even catch a cat, cow, or coyote on one of these critter highways. If you’re looking for a sneaky, mature buck, it’s often more productive to set up on more discreet trails running along the sides of ridges or to case out natural corridors like thin patches of woods bisecting fields or breaks in fence-lines.
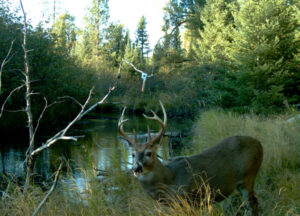
Another productive bottleneck set is a beaver dam, where almost every critter in the woods opts to cross at some time or another. If there’s no dam, there are almost always a couple of obvious creek or ditch crossings where deer have left hoof prints in the mud. Hang a camera so you get the deer along with the scenery of the creek.
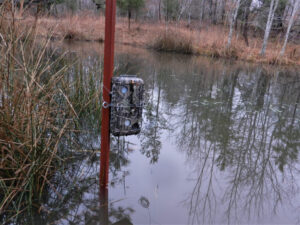
When deer are thirsty during a summer drought or the chase phase of the rut, it pays to play near water. The smaller the water source, the better. A puddle is a great place to set up a camera. For a more striking water shot, wade out a few and hammer in a fence post or a commercial cam mounting post. Affix your cam facing the bank where hoof prints reveal the whitetails’ favorite spot to drink.

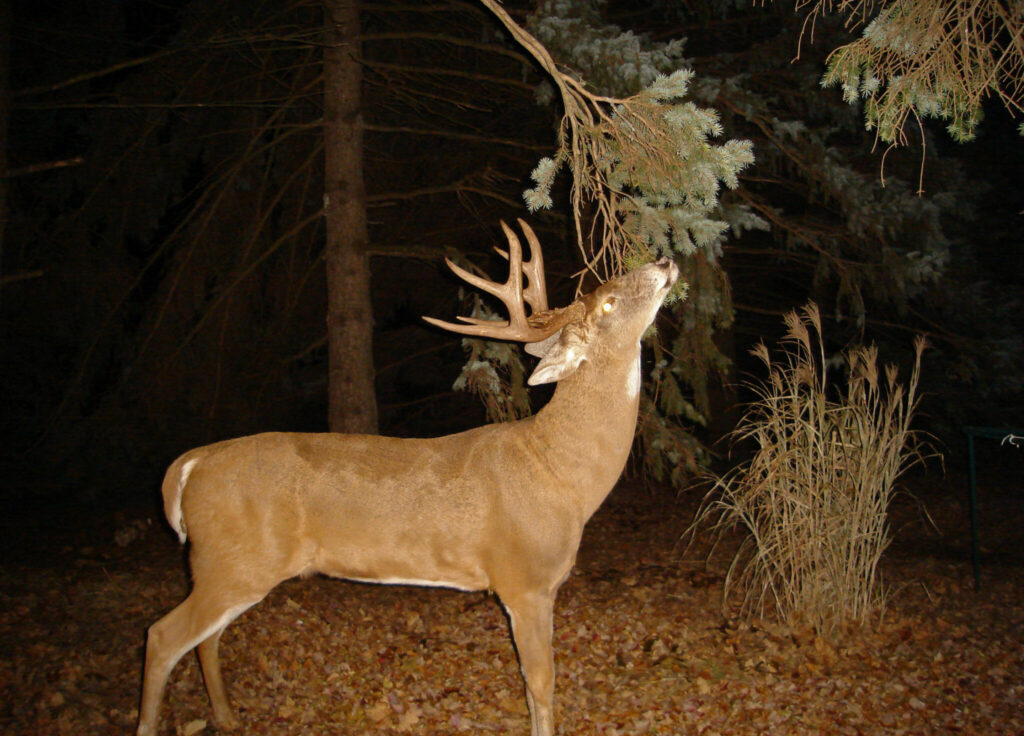
Use sex as a provocative photo shoot. You can set up on a rub line to find out which bucks are wearing out those thick tree trunks. Or monitor a large scrape under a licking branch. You can make your own scrape and doctor it up with commercial scents or even your own urine. A less dependable but more compelling approach is to set a cam on a high visibility spot in a field overlook- ing a buck decoy during the pre-rut or rut. You can even set up two cams, with one in photo mode and the other in video mode. Your deke may get pounded into the dirt, but the shocking footage will make it worth it!
Many of you probably already use fields and food plots for your trail camera sets. Your “bait” may be the size of a football field, so crank up the flash power to reach from end zone to end zone. Interestingly enough, a lot of bucks never even enter the field during the frisky phase. Try putting the camera on the downwind edge of the field facing into the woods to catch bucks cruising for does during the rut.
Lastly, the most popular and perhaps the most successful deer trail cam lure is food, whether in the form of bagged corn, mineral licks, natural forage, or any of the oodles of commercial attractant varieties. Just be sure you follow all game laws for your area as some places don’t allow supplemental feeding. Consider lengthening the trigger interval to a minute or more lest you fill your entire memory card in a couple of hours with photos of the same doe, raccoon, squirrel, bear, crow, or other furry creature dilly-dallying over a corn pile.
Make it Interesting
I’m obsessed with deer hunting, but I’m also a photographer at heart. I’ll unapologetically admit that, unlike most people, I find the most important feature of a trail camera to be the quality of the photos it produces. In some cases, your prep work is as important as the quality of the camera. I know most just want meat in the freezer or antlers on the wall, but why not make every picture the best it can be?

Change your point of view. Even though the literature says differently, face your camera toward the sunrise or sunset every once in a while. Direct sunlight sometimes overexposes your photos to the point where you can’t even recognize the subjects. But it’s a risk worth taking if you get an awesome shot of “Bullwinkle” beaming through the twilight.
Another compelling method is to lay the camera directly on the ground or affix it low on the tree facing up. You can loosen the security cable or strap and stick a branch in-between the bottom of the cam and the tree trunk so it angles upward – just like you can angle it down from a higher position. You can still focus on the buck’s eyes and antlers, but the photo angle makes the image more dramatic, and the critter appears colossal. You can even put a camera at treestand height facing down to make the picture pop.
Take the scenic route. If the exact spot of camera placement is of little consequence, find somewhere interesting for your camera set. Use colorful trees, water, a barn, or a fallen log as your background. Hang your cam overlooking a low spot in a fence to get awesome photos of deer in mid-air. Take it even further by bringing your own scenery if you can’t find anything in the vicinity. I’ve dragged mushroom-covered logs, dogwood branches, and even antique farm equipment to many a barren but promising trail cam spot.
For me, success depends on the goal. I may be thrilled to get one blurry, long-distance image of one side of a tall rack. Or I may demand pristine close-ups of momma doe nursing newborn twins framed by a majestic sunset.
But it’s up to you.
Join our weekly newsletter or subscribe to GameKeepers Magazine.
Your source for information, equipment, know-how, deals, and discounts to help you get the most from every hard-earned moment in the field.